Sunday, November 30, 2014

GameStop's misleading Customer Service

GameStop
13904 Town Center Blvd #300
Noblesville, IN 46060

My kids have somehow managed to rip the left joystick off of two different xbox one remotes.
Busted Controller - Still works.


I went in to this GameStop to purchase a new controller to be hidden from my children. While I was in there the guy working told me that they would give me a minimum of $15 for my busted controllers. I explained what was wrong with them and he reinforced that it didnt matter I can get $15 on trade even if they do notwork. 

So a few days later I ventured back out to this GameStop with on of my busted controllers. The same guy takes one look at it and says, "I cant give you money for this, its too busted....."


I called out the fact he specifically told me he would take it, even though I had fully disclosed the issues, of course that did not matter. 

Nonetheless I wasted a good hour of my life fighting through holiday mall traffic for a failed endeavor. Next time, I'll use Amazon

I wouldnt have even made the trip if he hadn't originally told me it didnt matter what was wrong with my controllers.


Sunday, August 10, 2014

Apple Cider Take 1

Apple Cider Take 1


Well I started my first batch of cider (this year) yesterday. Here are the ingredients:
  1. 7 gal Organic Earth Fare Apple Juice 


  2. 2.5 lbs (40oz.) Locally source clover honey from Eisele's in Westfield In
  3. 1 packet Lavlin nEC-1118
This is a rather easy process but here are the steps.
  • Sanitize all equip
  • Bring 1 gal Juice and 40oz honey to boil in pot
  • While waiting for boil - heat a couple ozs water and a tablespoon of honey to ~ 110F. Add in the yeast and stir well.
  • Remove Juice from heat once boiling and pour 4 gallons juice in
  • Siphon all 5 gallons into Primary vessel
  • Yeast will be alive and kicking within 20 minute of rehydrating.
  • Pitch yeast into primary
  • Top off primary with 2 more gallons of Juice
  • Add Airlock.

Starting Gravity: 1.06


I did all this around 6pm - when I got home around 230AM this thing was bubbling like mad. I have this in a dark room that is between 68 - 71 F all day long.

We'll check this again in a few week's time.

Tuesday, July 15, 2014

Cisco E4200 Antenna Mod (no solder)

Cisco E4200 Antenna Mod (no solder)


Frankly, its reception in a medium/large home sucks. I have it on a bookshelf in my living room on the south side of the house, while my son's Roku is on the north side of the home. I ended up buying a signal booster just so we could reach the bedroom. I also tried a PowerLine Adapter but I have an older model that was maxing out at 9mbps.

I went ahead an purchased this, that includes 2 7dbi high gain antennas with the proper connectors for the board.

It was really a snap to install, considering all of the antennas on this model have a connector (as opposed to being soldered on).

Here are some pics.


The end result? About a 10 dbi gain in the office when the antennas are aimed properly!


Saturday, July 12, 2014

My Workbench Project Part II

My Workbench Project


Ok so I made a couple of on the fly decisions when I went to the hardware store. I opted to purchase 2x3s instead of 2x4s - I purchased 10 total (the previous quote + 4 for the legs).

Total cost: was $19.50 (I think it was actually $16 but I lost the receipt, it isnt showing up on MyLowes, and the online price was $1.95 / 2x3 so I just did the math)

I also updated the design on the fly to remove the center 4 angle braces. Here are the updated drawings


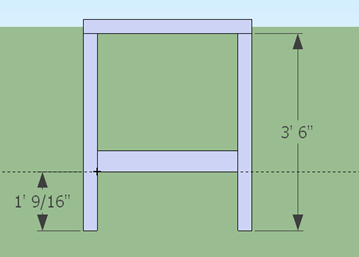
I made the legs out of 2 - 2x3s butted up against each other. I'm a tall guy so I made the leg height 3.5' - Here is a side profile with the measurements.


When I was at the hardware store I tried to pick the straightest wood I could, but I did end up with one piece that through me out of square, but it was only by about 1/8th of an inch - so no big deal. Here is the other side:


I have that much built now, but the garage is a mess so I dont have much room to take pictures. I'll get those uploaded tomorrow.

Thats all for now - Time to go watch some Game of Thrones!

My Workbench Project

My Workbench Project


So today I decided to start my work bench project. Hopefully in a week or so I will have a very sturdy, adjustable height workbench. Once this bench is finished I plan to start the remainder of my shelves in the garage. The overall goal here is to get everything of of the floor, organized, and the floor painted to prevent further wear.

To start I downloaded sketchup.

Once it was downloaded and installed I set out designing my Workbench. When I first began I had not yet decided to make this table adjustable. Here is the design of the top, fairly basic, should be sturdy.


You'll have to forgive my lack of sketchup-foo here.... I remembered this being easier when it was a Google project.

This is intended to be made out of standard 2x4s

corner braces = 2 (2x4)
long sides = 2 (2x4)
short sides = 1 (2x4)
cross beams= 1 (2x4)
I checked Lowes' website and the 2x4s were going for $2.64 so the total so far is: $15.84

I'll be headed out here in a few to buy the wood and construct the top - Updates to follow

Continued in Part II